Sunday, January 23, 2011

Kestrel 4000 PRO SL

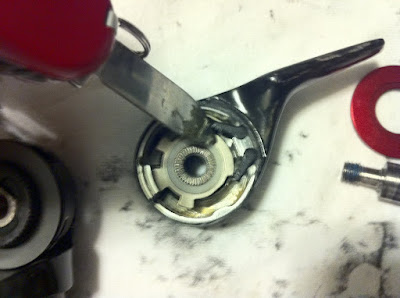
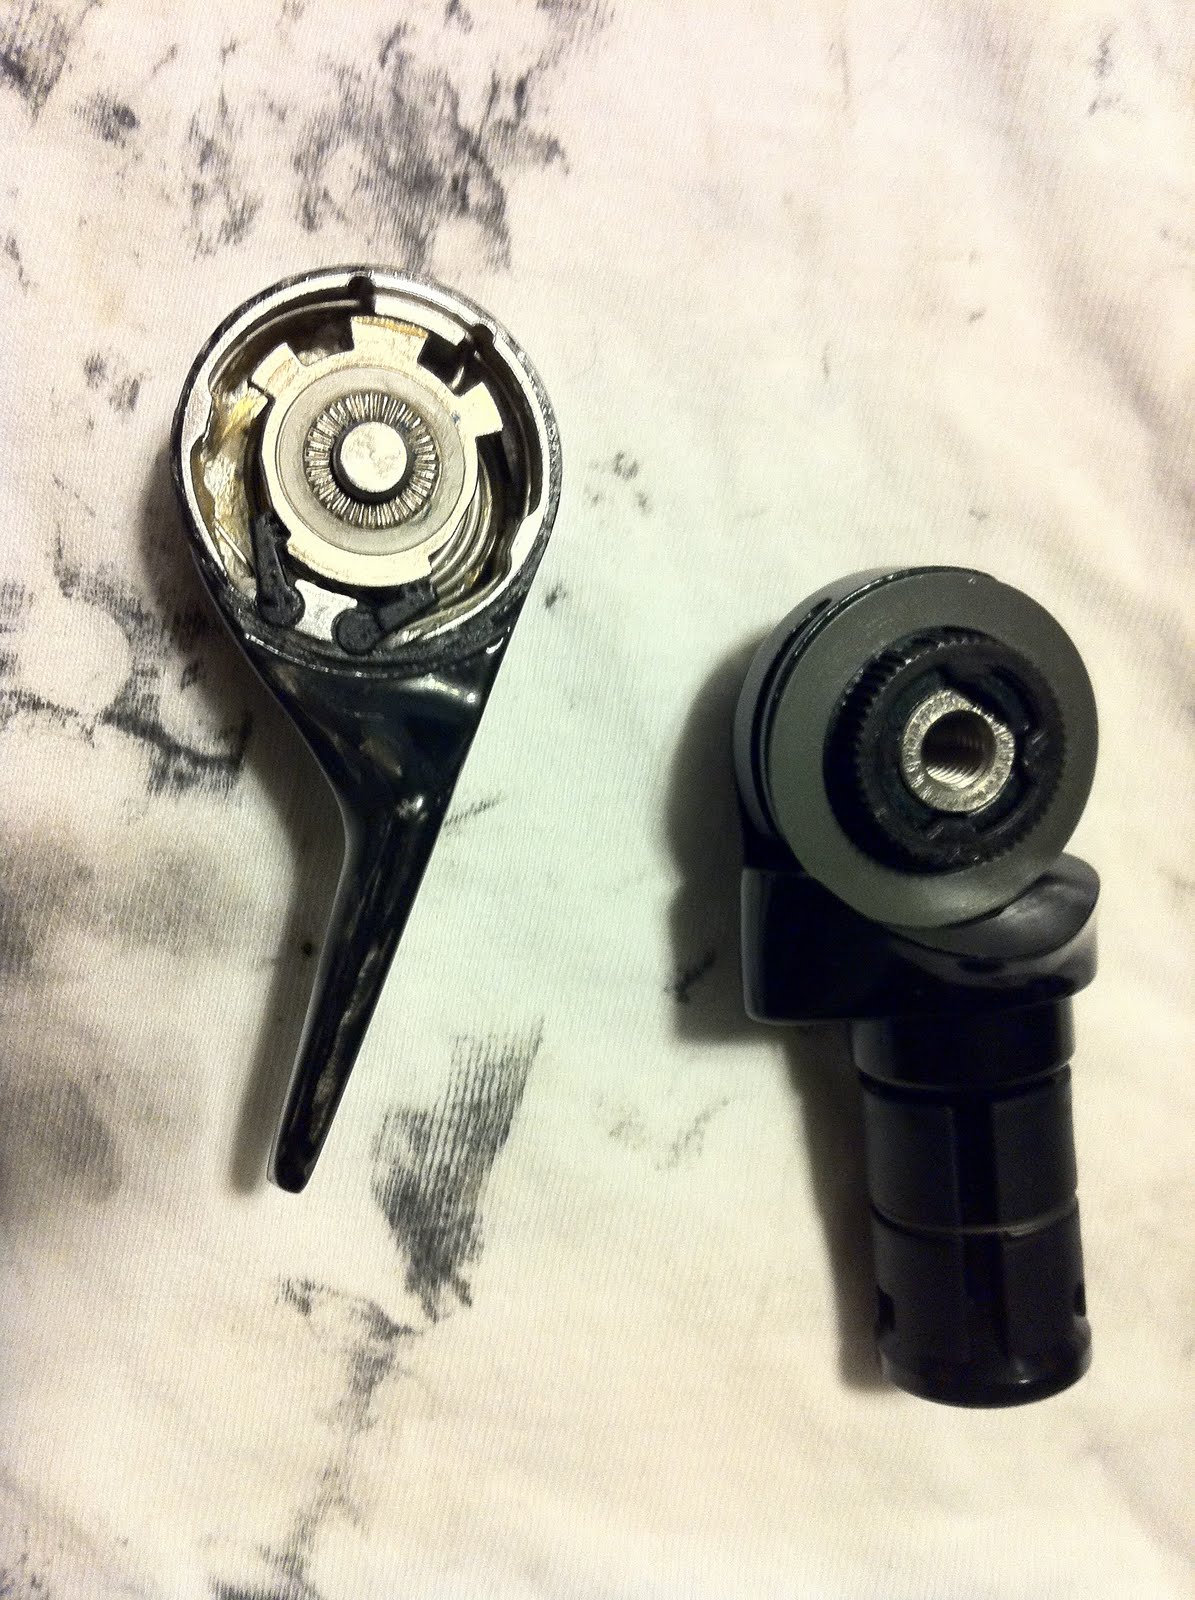
It's finally complete!! The first bike in the recent "revamping" of the bikes is finally complete. This bike was not without some difficulties to the extent that I was calling it a "demon bike" and actually took it to Austin Bikes twice. The first time was because I was using a 3T Ventus stem/bar but it has an airfoil behind the stem that covered over the frame where the cables entered. I agonized over cutting the piece off but the idea of modifying a bar on which I trust that much of my body weight wasn't a good plan. I finally sold the Ventus which was my favorite TT bar and went with its little brother, the 3T Brezza II with a 3T Arc Team stem. This combination fixed the first problem. Then I finished the build and cabled it but couldn't get it to shift smoothly. It turns out the shifters need the housing to run into the frame to have consistent cable pull. The Nokon housing won't fit in the internal sheath, only the inner lining but the inner lining isn't stiff enough to prevent flex and irregular cable pulls. This meant that I used traditional Jagwire housings for the shifters and Nokons for the brakes to keep the brake cables as tight as possible. The last experiment on this bike was the ISM saddle. A traditional TT saddle produces some serious chafing/soreness in the nether regions due to the way you sit on the nose and makes it hard to do repeat days on the TT bike for events like Tour de Gruene. The ISM saddle essentially cuts off the front of the saddle and so far is the most comfortable TT saddle I have tried. I also set it up with the SRAM R2C shifters which are my favorite bike "bling" item. Shifting is very easy and consistent similar to road shifters and while this is not a must have on a TT project, they are a huge nice to have. I did the first non-trainer ride on it this morning and once I got used to the TT position the bike felt smooth and fast. Unfortunately it was cold and cloudy this morning so the ride was short. There is a local TT series so I'll post more later after I spend some more time on it.


Build List Kestrel 4000SL
Frame/Fork Kestrel 4000SL 57cm/Kestrel Fork
Headset FSA CX Headset
Stem 3T Arx Team 80 mm
Handlebar 3T Brezza LTD 40 cm w/ Blackwell Wrist Relief Extensions
Seatpost Kestrel
Bottom Bracket SRAM BB30 w/ Wheelsmith Adapters
Crank SRAM SRM 172.5
Chainrings SRAM 54/42
Pedals Look Keo Classic
Front Derailleur SRAM Force
Rear Derailleur SRAM Force
Cassette SRAM 11/26
Chain Shimano Ultegra
Shifters SRAM R2C Shifters and 900 TT Brakes
Brakes TRP T-920
Brake Pads SwissStop Yellow
Seat ISM Adamo Racing 2
Cables Gore/Nokon
Wheels DT Swiss with 88mm Carbon Tubular and Corima Disc
Tires Vittoria EVO CX 21 tubular

Saturday, January 15, 2011

SRAM R2C TT Shifter Problems and Repairs

So I'm a little geeky about TT bikes and parts. One part that has always had my interest are the SRAM R2C TT shifters but the approximately $300 MSRP seemed excessive for my budget. In doing some research it seemed some individuals had issues with the shifter going "limp". After reading it appeared to be a very fixable problem so when a pair of "broken" shifters went up on eBay, I decided to test my theory. Here are my "budget" SRAM R2C shifters.


The "broken" shifter


Loosen the screw in the red plate to separate the shifter from the body and expose the internals


Loosen the screw the rest of the way to free the silver plate covering the spring and remove the silver plate


You can see the spring is twisted and off center. This appears to be the main issue that causes the shifter to "break" and swing up and down without changing gears.


Center the spring back down around the black hole the screw goes through. In this picture you can see the metal plate where the beginning and end of the spring attach. The long center prong one the 3 prong side of it will go down in between the beginning and end of the spring.

Carefully put the silver plate down so as not to dislodge the spring off of the black screw hole. Then use the back end of a knife or similar to push the two black pieces on either side of the long prong. Finally, carefully reinsert and tighten the silver piece in with the screw and then re-attach it to the rest of the shifter mechanism. The shifter should not work like new.

This worked perfectly for me and allowed me to get some great shifters on a heavy discount. Be aware that if you shift it to the extreme (highest or lowest gear) without a cable attached, this seems to dislodge the spring and cause it to "break". I was able to replicate this easily and then "fix" the shifters again. Shifting back and forth in the middle range didn't create the same problem. Some individuals have mentioned that it has "broken" while riding and if you have significant friction in the cable routing (which isn't uncommon on some TT frames and aerobar combinations), then it can create momentary "slack" while riding. If this happens when shifting to the extreme, it could theoretically re-create the scenario that happens when you shift it without a cable thus causing it to "break". Admittedly, I haven't ridden these shifters much yet but I will update if something changes. So far they have performed perfectly and have actually exceeded my expectations as it replicates much of the feel of shifting normal SRAM road levers. I hope this was a help.

Tokyo to Osaka

Excellent video by Nic Hill by way of the Velogogo blog.

Saturday, January 8, 2011

Cross Racing

Check out the video on the amazing Mud and Cowbells blog post. Some of the most bad-a** women riders doing their thing. Great shots and music on the video.

Raleigh HiLife

So I had a little extra money from the settlement on the MVA with the old cross bike after building up the new Kestrel TT and Van Dessel so I started looking at cheap cross bikes. I wanted another cross bike since the Van Dessel was to nice to take on mountain bike trails or bar rides. I also wanted something I could use as a pit bike in case of flats/mechanicals. (we don't have much mud here in TX). What followed was shopping but agonizing about buying a cheap cross bike or taking a chance on a single speed cross that I might not enjoy. I have posted in the past about building a fixie but finding out that I didn't enjoy riding it and I was afraid of the same experience with a single speed cross bike.

In the shopping around, the one bike that really caught my eye was this one. This bike appealled to the fun, risk-taking part of me while the standard Fuji comp appealed to the safe, practical part of me. The only issue was I couldn't find one. They were a limited run and sold out extremely fast. Then a new frame set popped up on eBay and we were in business. Almost all the parts came from the parts bin so it was a junkyard build. The levels are SRAM Rival levers gutted of the shift mechanism. After a couple of rides on it, I have to say its a fun bike to ride and a great break to get out and explore trails without worrying about mileage, cadence, or wattage. I'm looking forward to doing some single speed cross races next season.


Frame/Fork Raleigh Hi-Life 57 cm/Easton EC90X
Headset FSA CX Headset
Stem Ritchey Alloy WCS 100 mm
Handlebar Ritchey Pro 42 cm
Seatpost Thomson Elite 287 cm
Bottom Bracket SRAM GXP
Crank Truvativ Rouleur 172.5
Chainrings SRAM 38
Pedals Crankbrothers Eggbeater C
Front Derailleur N/A
Rear Derailleur N/A
Cassette Orgin8 Conversion Kit 18t
Chain Shimano Dura-Ace
Shifters SRAM Rival
Brakes Tektro CR720
Brake Pads Koolstop Salmon
Seat Selle Italia Flite Team
Cables Gore
Wheels Mavic Comos
Tires Kenda Small Block

Monday, January 3, 2011

Fuji SST 2.0

I've never really posted anything on my current road bike, the Fuji SST 2.0. It weighs in at 16 lbs 4 oz and is very stiff but not a harsh ride. It's an amazing difference going from the stiff but harsh Cannondale CAAD frame. While the Cannondale frame was stiff, it also felt every imperfection in the road. This made cornering at speed an adventure if the road had imperfections. In comparison, the Fuji feels if it's on rails it tracks so smoothly through rough corners. It's been a great bike and I'm looking forward to seeing how it does in the upcoming road season.


Build List:
Frame/Fork Fuji SST 2.0 56 cm/Fuji Fork
Headset Cane Creek
Stem Ritchey Alloy WCS 110 mm
Handlebar Ritchey Alloy WCS 42 cm
Seatpost Fuji
Bottom Bracket FSA Ceramic
Crank FSA SRM Crank 172.5
Chainrings FSA 53/38
Pedals Look Keo Classic
Front Derailleur SRAM Red
Rear Derailleur SRAM Force
Cassette SRAM 11/26
Chain Shimano Ultegra
Shifters SRAM Red
Brakes Zero Gravity Zero G Brakes
Brake Pads SwissStop Yellow
Seat Selle Italia SLR XP
Cables Nokon
Wheels DT Swiss hubs with 38mm Carbon Tubular Rims
Tires Vittoria EVO CX 21 tubular

Here is a video of the Fuji.

Sunday, January 2, 2011

Van Dessel Full Tilt Boogie

I finally completed the new cross bike and it is a beauty. I had my first ride on it and it performed amazingly on a 2 hour mix of pavement, single track, and gravel path. It's very stable and precise thanks to the carbon frame and tapered steerer. I also like the handling of the standard geometry versus the compact geometry of the old frame. The new Van Dessel is much lighter then my old Van Dessel Hole Shot which was pushing 21 lbs. This new one is a feathery 17 lbs.


Frame/Fork Van Dessel Full Tilt Boogie 56 cm/Van Dessel Fork
Headset FSA CX Headset
Stem Ritchey Alloy WCS 110 mm
Handlebar Ritchey Alloy WCS 42 cm
Seatpost Thomson Elite 287 cm
Bottom Bracket SRAM BB30
Crank SRAM Force BB30 172.5 mm
Chainrings SRAM 46/38
Pedals Crankbrothers Eggbeater 3
Front Derailleur SRAM Force
Rear Derailleur SRAM Force
Cassette SRAM 11/26
Chain Shimano Ultegra
Shifters SRAM Red
Brakes Avid Shorty Ultimate
Brake Pads SwissStop Yellow
Seat Selle Italia SLR XP
Cables Nokon
Wheels DT Swiss hubs with 50mm Carbon Tubular Rims
Tires Challenge Grifo 32 tubulars

I tried a quick video review of the frame, forgive the wildlife throughout.